
Lesson 3: More Basic Features
The features in Word 2007 can make your work easier, make your documents more attractive, and/or enable you to work more efficiently. This Microsoft Word lesson teaches you how to open a file, cut, copy, paste, use AutoText, use spell check, use Find and Replace, and change fonts. All of these features either make your work easier or make your document more attractive.
Open a File
When you do not have time to complete your work or when you finish your work, you can save and close your file. After saving a file, you can later open it to revise or finish it. You learned how to save a file in Lesson 2. In the exercise that follows, you learn how to open the file you saved.
EXERCISE 1
Open a File with Windows Vista
If you are using Windows Vista:
- Open Word 2007.
- Click the Microsoft Office button. A menu appears.
- Click Open. The Open dialog box appears.
- Locate the folder in which you saved the file. The file is named Lesson Two.docx.
- Click Lesson Two.docx.
- Click Open. The file you created during the previous lesson appears.
Open a File with Windows XP
If you are using Windows XP:
- Open Word 2007.
- Click the Microsoft Office button. A menu appears.
- Click Open. The Open dialog box appears.
- Use the Look In field to move to the folder in which you saved the file. The file is named Lesson Two.docx.
- Click Lesson Two.docx.
- Click Open. The file you created during the previous lesson appears.
Alternate Method—Opening a File with Keys
- Open Word 2007.
- Press Ctrl+o.
- Locate the folder in which you saved your file. The file is named Lesson Two.docx
- Click Lesson Two.docx.
- Click Open. The file you created during the previous lesson appears.
Cut and Paste
You can use Word's Cut feature to remove information from a document. The you can use the Paste feature to place the information you cut anywhere in the same or another document. In other words, you can move information from one place in a document to another place in the same or different document by using the Cut and Paste features. The Office Clipboard is a storage area. When you cut, Word stores the data you cut on the Clipboard. You can paste the information that is stored on the Clipboard as often as you like.
EXERCISE 2
Cut with the Ribbon
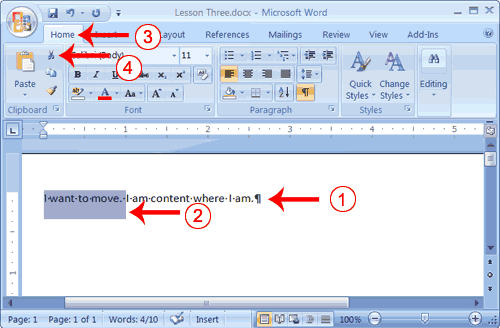
- Type the following:
I want to move. I am content where I am. - Select "I want to move. "
- Choose the Home tab.
- Click the Cut button
 in the Clipboard group. Word cuts the text you selected and places it on the Clipboard. Your text should now read:
"I am content where I am."
Paste with the Ribbon

- Place the cursor after the period in the sentence "I am content where I am."
- Press the spacebar to leave a space.
- Choose the Home tab.
- Click the Paste button
 in the Clipboard group. Word pastes the text on the Clipboard. Your text should now read:
"I am content where I am. I want to move."
Alternate Method—Cut with a Context Menu
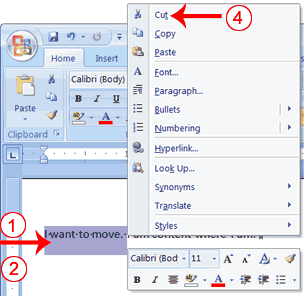
- Type the following:
I want to move. I am content where I am. - Select "I want to move. "
- Right-click. The Mini toolbar and a context menu appear.
- Click Cut on the menu. Your text should now read:
"I am content where I am."
Alternate Method—Paste with a Context Menu
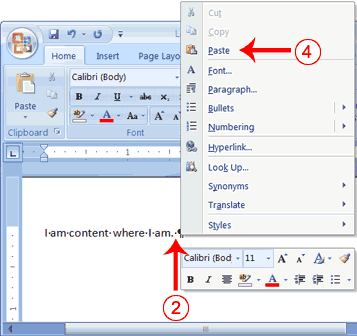
- Place the cursor after the period in the sentence
"I am content where I am." - Press the spacebar to leave a space.
- Right-click. A Mini toolbar and a context menu appear.
- Click Paste. Your text should now read:
"I am content where I am. I want to move."
Alternate Method—Cut with Keys
- Type the following:
I want to move. I am content where I am. - Select "I want to move."
- Press Ctrl+x.
- Your text should now read:
" I am content where I am."
Alternate Method—Paste with Keys
- Place the cursor after the period in the sentence: "I am content where I am."
- Press the spacebar to leave a space.
- Press Ctrl+v.
- Your text should now read:
"I am content where I am. I want to move."
Copy and Paste
In Microsoft Word, you can copy information from one area of a document and place the information you copied anywhere in the same or another document. In other words, after you type information into a document, if you want to place the same information somewhere else, you do not have to retype the information. You simple copy it and then paste it in the new location. As with cut data, Word stores copied data on the Clipboard.
EXERCISE 3
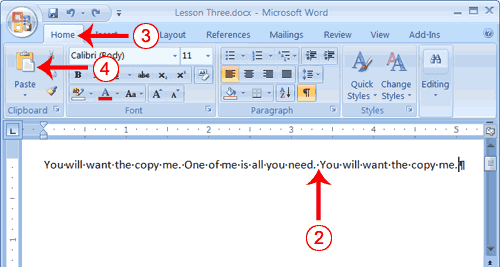
Copy with the Ribbon
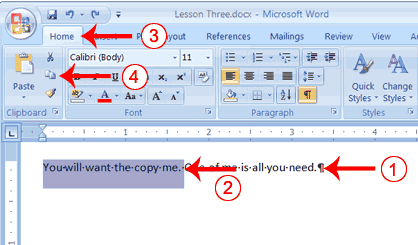
- Type the following:
You will want to copy me. One of me is all you need. - Select "You will want to copy me."
- Choose the Home tab.
- Click the Copy button
 in the Clipboard group. Word copies the data you selected to the Clipboard.
Paste with the Ribbon
- Place the cursor after the period in the sentence: "One of me is all you need."
- Press the spacebar to leave a space.
- Choose the Home tab.
- Click the Paste button in the Clipboard group. Word places the data you copied at the insertion point. Your text should now read: "You will want to copy me. One of me is all you need. You will want to copy me."
Alternate Method—Copy with a Context Menu
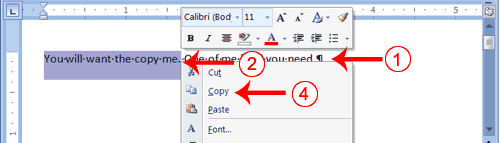
- Type the following:
You will want to copy me. One of me is all you need. - Select "You will want to copy me."
- Right-click. A Mini toolbar and a context menu appear.
- Click Copy. Word places the data you copied at the insertion point. Your text should now read: "You will want to copy me. One of me is all you need. You will want to copy me."
Alternate Method—Paste with a Context Menu
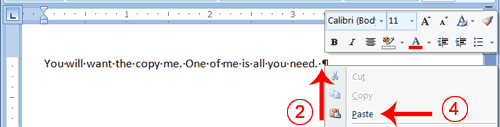
- Place the cursor after the period in the sentence: "One of me is all you need."
- Press the spacebar to leave a space.
- Right-click. A context menu appears.
- Click Paste. Word pastes the information on the Clipboard into the document.
Alternate Method—Copy with Keys
- Type the following:
You will want to copy me. One of me is all you need. - Select "You will want to copy me. "
- Press Ctrl+c. Word copies the information you selected to the Clipboard.
Alternate Method—Paste with Keys
- Place the cursor after the period in the sentence "One of me is all you need."
- Press the spacebar to leave a space.
- Press Ctrl+v.
- Your text should now read:
"You will want to copy me. One of me is all you need. You will want to copy me."
Use the Clipboard
As you cut or copy, Word can store the information you have cut or copied on the Clipboard in a hierarchy. Then each time you cut or copy, the data you just cut or copied moves to the top of the Clipboard hierarchy and the data previously at the top moves down one level. When you choose Paste, the item at the top of the hierarchy is the item Word pastes into your document. The Clipboard can store up to 24 items. You can paste any item on the Clipboard into your document by placing your cursor at the insertion point, displaying the Clipboard pane, and then clicking the item.
The Clipboard pane includes an Options button. You can click the Options button to set the Clipboard options described in the following table.
| Option | Description |
|---|---|
| Show Office Clipboard Automatically | Shows the Clipboard automatically when you copy items. |
| Show Office Clipboard When Ctrl+c Pressed Twice | Shows the Clipboard when you press Ctrl+c twice. |
| Collect Without Showing Office Clipboard | Copies to the Clipboard without displaying the Clipboard pane. |
| Show Office Clipboard Icon on Taskbar | Displays the Clipboard icon on your system taskbar. |
| Show Status Near Taskbar When Copying | Displays the number of items copied on the taskbar when copying. |
EXERCISE 4
Use the Clipboard

- Place the cursor at the point at which you want to insert your text.
- Choose the Home tab.
- Click the Clipboard dialog box launcher to open the Clipboard.
- Click the item on the clipboard you want to insert into your document. Word pastes the Clipboard item into your document at the insertion point.
Create AutoText
Cut and Copy both store information on the Clipboard. Information you store on the Clipboard is eventually lost. If you want to store information permanently for reuse, use AutoText. AutoText permanently stores information for future use.
EXERCISE 5
Create AutoText

- Type the following:
AutoText information is stored permanently. - Select "AutoText information is stored permanently."
- Choose the Insert tab.
- Click Quick Parts in the Text group. A menu appears.
- Click Save Selection to Quick Part Gallery. The Create New Building Block dialog box appears.

- Microsoft Word suggests a name. Change the name by typing AT in the Name field.
- Click OK. The dialog box closes.
- Click anywhere in the text area to remove the highlighting.
- Place the cursor between the period in the sentence you just typed and the paragraph marker (¶).
- Press the spacebar to leave a blank space.
- Type AT.
- Press F3. Your text should now read:
"AutoText information is stored permanently. AutoText information is stored permanently."
Note: Whenever you need the text, simply type the name (AT) and then press F3.
Use Spell Check
Word checks your spelling and grammar as you type. Spelling errors display with a red wavy line under the word. Grammar errors display with a green wavy line under the error. In Word 2007, you can use the Review tab's Spelling & Grammar button to initiate a spell and grammar check of your document.
EXERCISE 6
Use Spell Check
- Type the following exactly as shown. Include all errors.
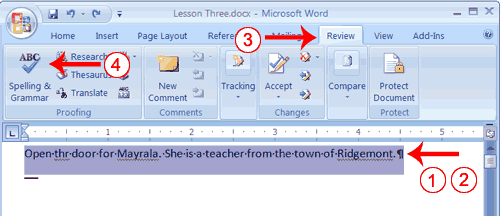
Open thr door for Mayrala. She is a teacher from the town of Ridgemont. - Select: "Open thr door for Mayrala. She is a teacher from the town of Ridgemont."
- Choose the Review tab.
- Click the Spelling & Grammar button. The Spelling and Grammar dialog box appears.
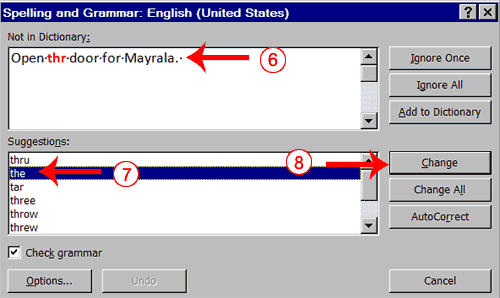
- "The" is misspelled, so it is highlighted on the screen and noted in the Not in Dictionary box. Word suggests correct spellings. These suggestions are found in the Suggestions box.
- Click "the" in the Suggestions box.
- Click Change.
Note: If the word is misspelled in several places, click Change All to correct all misspellings. - The name "Mayrala" is not in the dictionary, but it is correct. Click Ignore Once to leave "Mayrala" in the document with its current spelling.
Note: If a word appears in several places in the document, click Ignore All so you are not prompted to correct the spelling for each occurrence. - "Ridgemont" is not found in the dictionary. If you frequently use a word not found in the dictionary, you might want to add that word to the dictionary by clicking the Add to Dictionary button. Word will then recognize the word the next time it appears. Click Add to Dictionary.
- The following should appear on your screen: "Word finished checking the selection. Do you want to continue checking the remainder of the document?"
- Click No. If you wanted Word to spell-check the entire document, you would have clicked Yes.
Note: You can also press F7 to initiate a spelling and grammar check. If you don't have anything selected, Word checks the entire document.
Find and Replace
If you need to find a particular word or phrase in your document, you can use the Find command. This command is especially useful when you are working with large files. If you want to search the entire document, simply execute the Find command. If you want to limit your search to a selected area, select that area and then execute the Find command.
After you find the word or phrase you are searching for, you can replace it with new text by executing the Replace command.
EXERCISE 7
Use Find with the Ribbon
- Type the following:
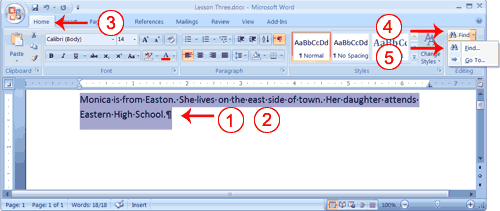
Monica is from Easton. She lives on the east side of town. Her daughter attends Eastern High School. - Select: "Monica is from Easton. She lives on the east side of town. Her daughter attends Eastern High School."
- Choose the Home tab.
- Click Find in the Editing group. A menu appears.
- Click the Find option on the menu. The Find and Replace dialog box appears.
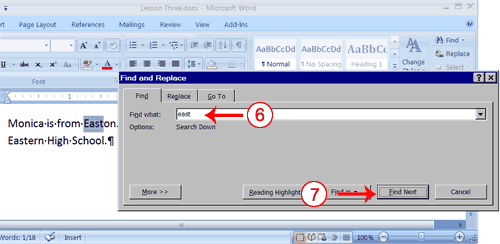
- Type east in the Find What field.
- Click Find Next.
Note that the "East" in Easton is highlighted. - Click Find Next again.
Note that "east" is highlighted. - Click Find Next again.
Note that the "East" in Eastern is highlighted. - Click Find Next. The following message should appear: "Word has finished searching the selection. Do you want to search the remainder of the document?"
- Click No.
- Click Cancel.
Alternate Method—Find with Keys
- Select: "Monica is from Easton. She lives on the east side of town. Her daughter attends Eastern High School."
- Press Ctrl+f.
- Follow steps 6 through 12 in the preceding section.
Use Replace with the Ribbon
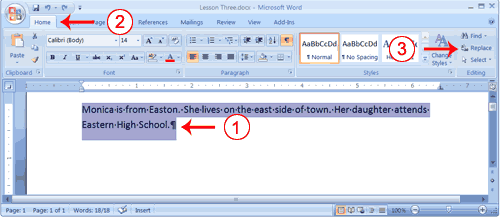
- Select "Monica is from Easton. She lives on the east side of town. Her daughter attends Eastern High School."
- Choose the Home tab.
- Click Replace in the Editing group. The Find and Replace dialog box appears.
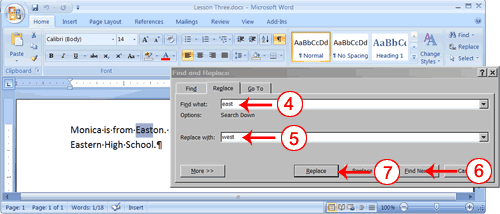
- Type east in the Find What box.
- Type west in the Replace With box.
- Click Find Next. The East in Easton is highlighted.
- Click Replace. Word replaces the "East" in "Easton" with "West" and then highlights the word "east."
- Click Replace. Word replaces the word "east" with "west" and then highlights the word "Eastern."
- Click Close. Do not replace the "East" in "Eastern" with "West."
- Your text should now read,
"Monica is from Weston. She lives on the west side of town. Her daughter attends Eastern High School."
Alternate Method—Replace with Keys
- Select "Monica is from Easton. She lives on the west side of town. Her daughter attends Western High School."
- Press Ctrl+h.
- Follow steps 4 through 11 in the preceding section.
Change the Font Size
A font is a set of characters (text) represented in a single typeface. Each character within a font is created by using the same basic style. In Microsoft Word, you can change the size of your font. The following exercise illustrates changing the font size.
EXERCISE 8
Change the Font Size
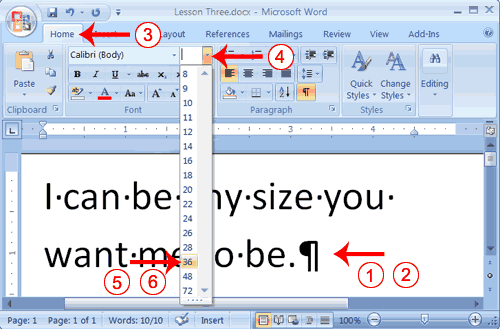
- Type the following:
I can be any size you want me to be. - Select "I can be any size you want me to be."
- Choose the Home tab.
- In the Font group, click the down arrow next to the Font Size box. A menu of font sizes appears.
- Move your cursor over the menu of font sizes. As you do, Word 2007 provides a live preview of the effect of applying each font size.
- Click 36 to select it as your font size.
Note: If you know the font size you want, you can type it in the Font Size field.
Alternate Method—Change the Font Size with Grow Font and Shrink Font
You can also change the size of your font by clicking the Grow Font and Shrink Font buttons. Selecting text and then clicking the Grow Font button makes your font larger. Selecting text and then clicking the Shrink Font button makes your font smaller.
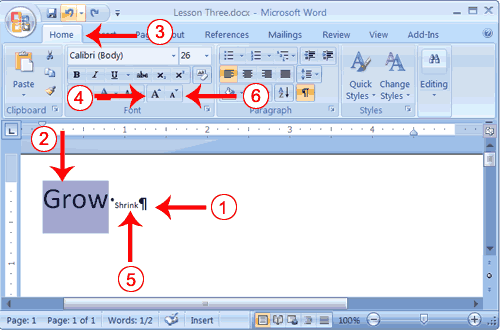
- Type the following:
Grow Shrink - Select "Grow"
- Choose the Home tab.
- Click the Grow Font button
 several times. Your font becomes larger.
 - Select Shrink.
- Click the Shrink Font button
 several times. Your font becomes smaller.
Change the Font
In Microsoft Word, you can change the font (the "family" of type you use for your text). This feature is illustrated in the following exercise:
EXERCISE 9
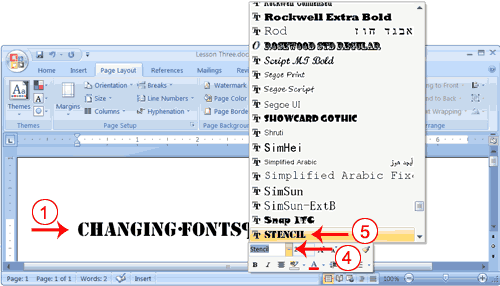
Change the Font with the Ribbon
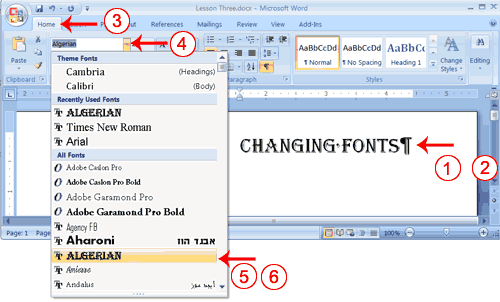
- Type the following:
Changing fonts - Select "Changing fonts."
- Choose the Home tab.
- Click the down arrow next to the Font field. A menu of fonts appears.
- Move the cursor over the list of fonts. Word 2007 provides a live preview of what the font will look like if you select it.
- Click the font name to select the font you want.
Alternate Method—Change the Font with the Mini Toolbar
- Select "Changing fonts."
- Right-click. The Mini toolbar and a menu appears.
- Move to the Mini toolbar.
- Click the down arrow next to the Font field. A menu of fonts appears.
- Click the name of the font you want.
Save Your File
This is the end of Lesson 3. You can save your file and close Word. See Lesson 2 to learn how to save and close.