Lesson 2: Microsoft Word 2007 Basic Features
Lesson 1 familiarized you with the the Microsoft Word window. You are now ready to learn how to create a Word document. This lesson covers typing, using the Backspace key, using the Delete key, inserting text, bolding, underlining, and italicizing. To begin, open Microsoft Word.
Type,
Backspace, and Delete
In Microsoft Word, you create documents by typing them. For
example, if you want to create a report, you open Microsoft Word and then
begin typing. You do not have to do anything when your text reaches the
end of a line and you want to move to a new line—Microsoft Word
automatically moves your text to a new line. If you want to
start a new paragraph, press Enter. Microsoft word creates a blank line
to indicate the start of a new paragraph. To
capitalize, hold down the Shift key while typing the letter you want to
capitalize. If you make a mistake, you can delete what you typed
and then type your correction.
You can use the Backspace key to delete. Each time you press the Backspace key, Microsoft Word deletes the character that precedes the insertion point. The insertion point is the point at which your mouse pointer is located. You can also delete text by using the Delete key. First, you select the text you want to delete; then you press the Delete key.
EXERCISE 1
Type and Backspace
- Type the following sentence:
Joe has a very large house. - Delete the word "house." Using either the arrow keys or the mouse, place the cursor between the period and the "e" in "house."
- Press the Backspace key until the word "house" is deleted.
- Type boat. The sentence should now read:
"Joe has a very large boat."
Delete
Delete the word "very" from the sentence you just typed.
- Select the word "very." You can place the cursor before the "v" in the word "very," press and hold down the Shift key, and then press the right arrow key until the word "very" is highlighted.
- Press the Delete key. The sentence should now read:
"Joe has a large boat."
Insert and Overtype
While creating your document, you may find you need to insert text—place new text
between existing text. Suppose, you type the sentence, "Joe has a
large boat." After typing it, you decide you want to change the
sentence to "Joe has a large blue boat." With
Microsoft Word, inserting a word, phrase, or even several paragraphs is easy.
Alternatively, you may want to overtype text—replace old text with new text. For example, suppose you type the sentence, "Joe has a large blue boat." After typing it, you decide you want to change the sentence to "Joe has a large gray boat." With Microsoft Word, overtyping the word blue with the word gray is also easy. Before you attempt to insert or overtype, you should check the mode you are in—Insert or Overtype. You right-click the Status bar and then use the Customize Status Bar menu to place the Insert/Overtype button on the Status bar. You can then use the Insert/Overtype button to switch between Insert and Overtype mode. When you are in Insert mode, you can insert text. When you are in Overtype mode, you can overtype text. By default, Microsoft Word is in the Insert mode.
EXERCISE 2
Placing the Insert/Overtype button on the Status bar
- Right-click the Status bar. The Customize Status Bar menu appears.
- Click Overtype. The Insert/Overtype button appears on the Status bar.
- If the word Insert appears on the Status bar, you are in Insert mode.
- If the word Overtype appears on the Status bar, click the word Overtype and it will change to Insert, thereby changing Word to Insert mode.
Insert
Make sure you are in Insert mode before proceeding. You are going to insert the word "blue" between the words "large" and "boat."
- Place the cursor after the space between the words "large" and "boat."
- Type the word blue.
- Press the spacebar to add a space.
- The sentence should now read:
"Joe has a large blue boat."
Overtype
You can type over the current text (replace the current text with new text) in the Overtype mode. Do the following to change to the Overtype mode.
- Click "Insert" on the Status bar. The word Insert changes to Overtype.
Change the word "blue" to "gray."
- Place the cursor before the letter "b" in "blue."
- Type the word gray.
- The sentence should now read:
"Joe has a large gray boat."
Note: You can overtype text without changing to Overtype mode by selecting the text you want to overtype and then typing.
Bold,
Italicize, and Underline
When creating a document, you may need to emphasize particular words or phrases by bolding, underlining, or italicizing. Also, certain grammatical constructs require that you bold, underline, or italicize. You can bold, underline, and italicize when using Word. You also can combine these features—in other words, you can bold, underline, and italicize a single piece of text.
When you need
to perform a task in Microsoft Word, you can usually choose from several
methods. The exercises that follow show you how to bold,
underline, or italicize using four different methods: using the launcher, the
Ribbon, the Mini-toolbar/context menu, and the keyboard.
EXERCISE 3
Type the following exactly as shown. Remember, pressing the Enter key starts a new paragraph. Press the Enter key at the end of each of the following lines to start a new paragraph.
Launcher: Bold Italicize Underline these words. All three Regular
Ribbon: Bold Italicize Underline these words. All three Regular
Mini Toolbar: Bold Italicize Regular
Keys: Bold Italicize Underline these words. All three Regular
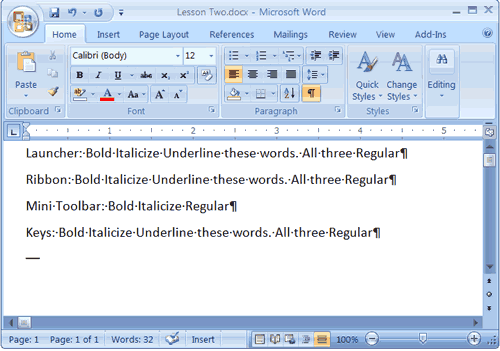
Your screen should look similar to the one
shown here.
Bold with the Dialog Box Launcher
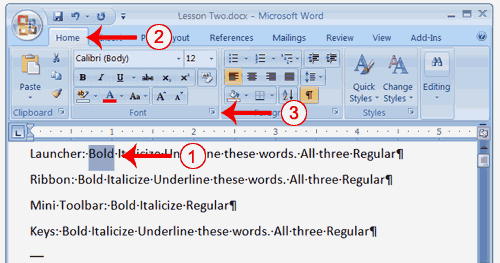
- On the line that begins with Launcher, select the word "Bold." You can place the cursor before the letter "B" in "Bold." Press the Shift key; then press the right arrow key until the entire word is highlighted.
- Choose the Home tab.
- Click the dialog box launcher in the Font group. The Font dialog box appears.
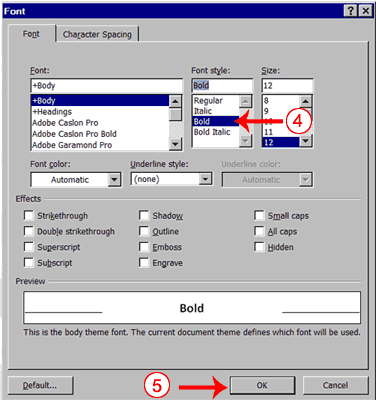
- Click Bold in the Font Style box.
Note: You can see the effect of your action in the Preview window. To remove the bold, click Regular. - Click OK to close the dialog box.
- Click anywhere in the text area to remove the highlighting. You have bolded the word bold.
Alternate Method—Bold with the Ribbon
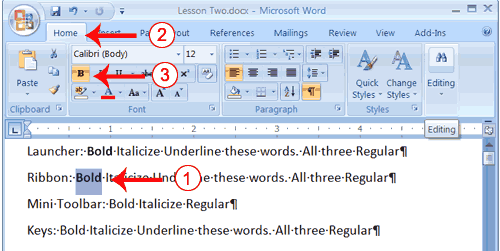
- On the line that begins with "Ribbon," select the word "Bold." You can place the cursor before the letter "B" in "Bold." Press the Shift key; then press the right arrow key until the entire word is highlighted.
- Choose the Home tab.
- Click the Bold button
 in the
Font group. You have bolded the word bold.
Note: To remove the bold, you can select the text and then click the Bold button again.
 - Click anywhere in the text area to remove the highlighting.
Alternate Method - Bold with the Mini Toolbar
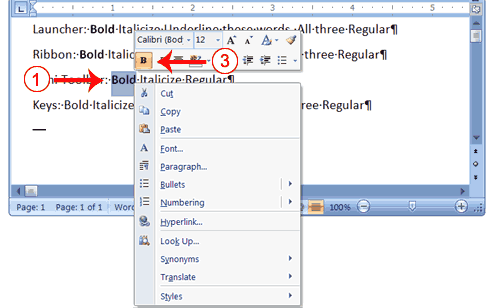
- On the line that begins with "Mini Toolbar," select the
word "Bold." You can place the cursor before the letter "B" in
"Bold."Press the Shift key; then press the right arrow key until
the entire word is highlighted.
- Right-click. The Mini toolbar appears.
- Click the Bold button
 .
You have bolded the word bold.
Alternate Method—Bold with Keys
- On the line that begins with "Keys," select the word "Bold." You can place the cursor before the letter "B" in "Bold." Press the Shift key; then press the right arrow key until the entire word is highlighted.
- Press Ctrl+b (hold down the Ctrl key while pressing b).
Note: To remove the Bold, press Ctrl+b again. You can also remove formatting by pressing Ctrl+spacebar. - Click anywhere in the text area to remove the highlighting.
Italicize with the Dialog Box Launcher
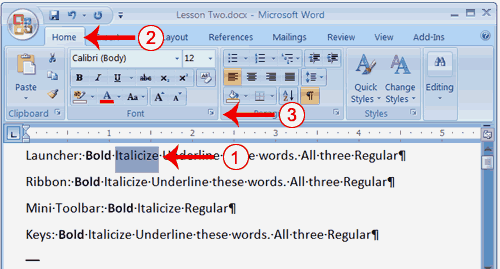
- On the line that begins with Launcher, select the word "Italicize." You can place the cursor before the letter "I" in "Italicize." Press the Shift key; then press the right arrow key until the entire word is highlighted.
- Choose the Home tab.
- Click the dialog box launcher in the Font group. The Font dialog box appears.
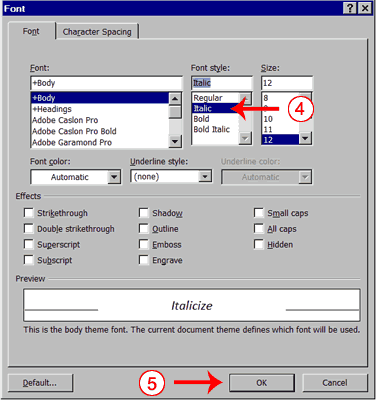
- Click Italic in the Font Style box.
Note: You can see the effect of your selection in the Preview window. To remove the italics, click Regular in the Font Style box. - Click OK to close the Font dialog box.
- Click anywhere in the text area to remove the highlighting. You have italicized the word Italicize.
Alternate Method—Italicize with the Ribbon
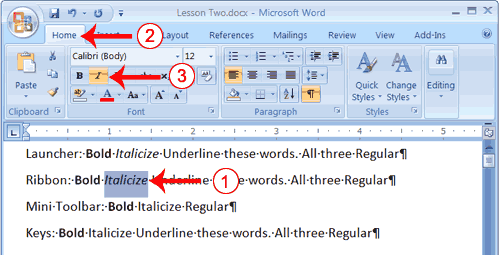
- On the line that begins with "Ribbon," select the word "Italicize." You can place the cursor before the letter "I" in "Italicize." Press the Shift key; then press the right arrow key until the entire word is highlighted.
- Choose the Home tab.
- Click the Italic button
 on the Ribbon. You have italicized the word Italicize.
Note: To remove the italics, select the text and click the Italicize button again.
 - Click anywhere in the text area to remove the highlighting.
Alternate Method—Italicize with the Mini Toolbar
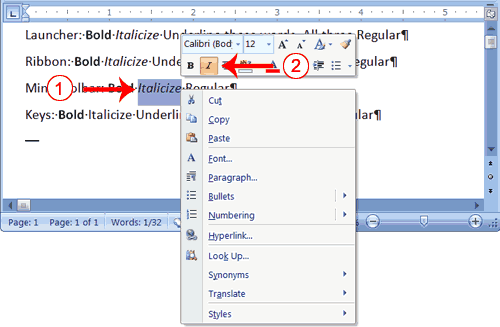
- On the line that begins with "Mini Toolbar," select the
word "Italicize." You can place the cursor before the letter "I" in
"Italicize." Press the Shift key; then press the right arrow key until
the entire word is highlighted.
- Right-click. The Mini toolbar appears.
- Click the Italic button
 .
You have italicized the word Italicize.
Alternate Method—Italicize with Keys
- On the line that begins with "Keys," select the word "Italicize." You can place the cursor before the letter "I" in "Italicize." Press the Shift key; then press the right arrow key until the entire word is highlighted.
- Press Ctrl+i (hold down the Ctrl key while pressing i).
Note: To remove italics, press Ctrl+i again. You can also remove formatting by pressing Ctrl+spacebar. - Click anywhere in the text area to remove the highlighting.You have italicized the word Italicize.
Underline with the Dialog Box Launcher
You can underline when using Word. Word provides you with many types of underlines from which to choose.The following are some of the underlines that are available if you use the dialog box launcher:
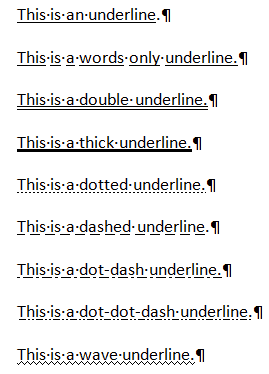
The following illustrates underlining with the dialog box launcher:
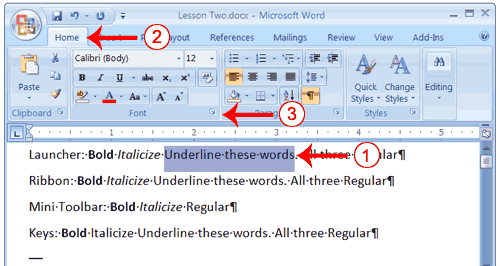
- On the line that begins with "Launcher," select the words "Underline these words."
- Choose the Home tab.
- Click the dialog box launcher in the Font group. The Font dialog box appears.
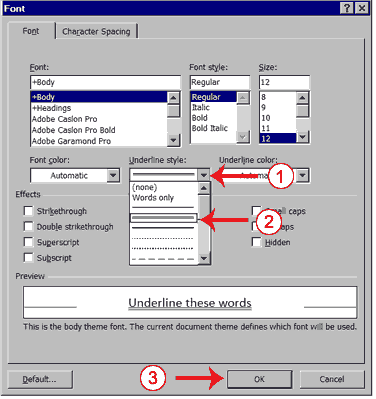
- In the Underline Style box, click the down arrow to open the pull-down menu.
- Click the type of underline you wish to use.
Note: To remove an underline, you select None from the pull-down menu. - Click OK to close the dialog box. The underline you selected appears under the words.
- Click anywhere in the text area to remove the highlighting.
Alternate Method—Underline with the Ribbon
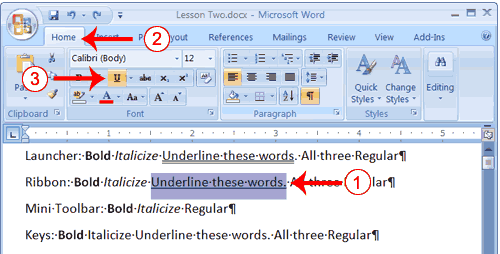
- On the line that begins with "Ribbon," select the words "Underline these words."
- Choose the Home tab.
- Click the Underline button
 in the Font group .
Alternatively, you can press the down arrow
  next to the underline button
  and click to choose the type of underline you want.
Note: To remove the underlining, click the Underline button again.
 - Click anywhere in the text area to remove the highlighting.
Alternate Method—Underline with Keys
- On the line that begins with "Keys," select the words "Underline these words."
- Press Ctrl+u (hold down the Ctrl key while pressing u).
Note: To remove the underlining, press Ctrl+u again. - Click anywhere in the text area to remove the highlighting.
All Three with the Dialog Box Launcher
- On the line that begins with "Launcher," select the words "All three."
- Choose the Home tab.
- Click the dialog box launcher in the Font group. The Font dialog box appears.
- In the Font Style box, click Bold Italic.
Note: You can see the effect of your selection in the preview window. To turn off the Bold Italic, click Regular. - In the Underline box, click to open the pull-down menu.
Click the type of underline you want to use.
Note: To remove an underline, select None from the pull-down menu. - Click OK to close the dialog box.
- Click anywhere in the text area to remove the highlighting.
Alternate Method—All Three with the Ribbon
- On the line that begins with "Ribbon," select the words "All three."
- Choose the Home tab.
- Click the Bold button
 in
the Font group.
 - Click the Italic button
 in the Font group.
 - Click the Underline button
 in the Font group.
 - Click anywhere in the text area to remove the highlighting.
Alternate Method—All Three with Keys
- On the line that begins with "Keys," select the words "All three."
- Press Ctrl+b (bold).
- Press Ctrl+i (italicize).
- Press Ctrl+u (underline).
Note: You can remove formatting by highlighting the text and pressing Ctrl+spacebar. - Click anywhere in the text area to remove the highlighting.
Save a File and Close Word
You must save your documents if you wish to recall them later.
You can use the Save option on the Microsoft Office menu, to save a document. You can also save a document by
typing Ctrl+s. The first time you save a document, the Save As dialog
box appears. Use the Save As dialog box to locate the folder
in which you want to save your document and to give your document a
name. After you have saved your document at least once, you can save
any changes you make to your document simply by clicking the Save after you click the Microsoft Office button.
The following exercise shows you how to save the file you just
created and close Word. You will name your file Lesson Two.
EXERCISE 4
Save a File—Windows Vista:
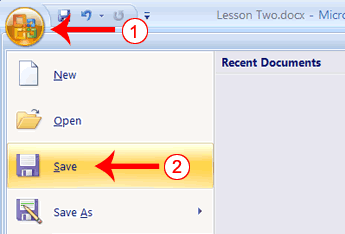
- Click the Microsoft Office button. A menu appears.
- Click Save. The Save As dialog box appears, if you are saving your document for the first time.
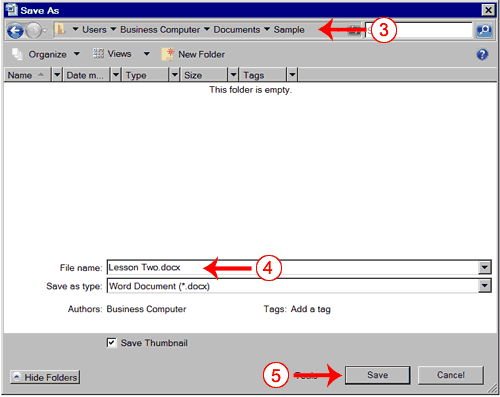
- Use the Address bar to locate the folder in which you want to save your file.
- Name your file by typing Lesson Two.docx in the File Name box.
- Click Save.
- Click the Microsoft Office button. A menu appears.
- Click Exit Word, which is located in the bottom-right corner of the window. Word closes.
Save a File—Windows XP
- Click the Microsoft Office button. A menu appears.
- Click Save. The Save As dialog box appears if you are saving your document for the first time.
- Specify the correct folder in the Save In box.
- Name your document by typing Lesson Two in the File Name box.
- Click Save.
- Click the Microsoft Office button. A menu appears.
- Click Exit Word, which is located in the bottom-right corner of the window. Word closes.
