THE FLOOD FILL TOOL
You use the Flood Fill tool to fill an image or a selection with a color, pattern, or gradient. A pattern can be any image or selected part of an image. You can only apply a pattern to 24-bit and grayscale images. The Gradient Fill is used to flood-fill an image with blends of color. Gradient Fills can only be applied to 24-bit and grayscale images.
Flood Fill -- Solid Color
- Open a new file.
File > New
Settings:
Width: 100 Pixels
Height: 100 Pixels
Resolution: 72 Pixels/inch
Background Color: White
Image Type: 16.7 Million Colors
- Set your foreground color to pink.
Settings:
Red: 255
Green: 0
Blue: 255
- Set your background color to yellow.
Settings:
Red: 255
Green: 255
Blue: 0
- Select the Flood Fill tool
 .
Set the tool options.
Settings:
Flood Fill tab
Fill Style: Solid Color
Blend Mode: Normal
Paper Texture: None
Match Mode: None
Opacity: 100
Sample Merged: Yes
- Flood-fill the image (left-click in the center of the image.) Your image should look like the one shown here.

- Select the Selection tool. Set the tool options.
Settings:
Selection type: Circle
Feather: 0
Antialias: Yes
- In the center of the image, draw a circle selection with the Selection tool.
- Select the Flood Fill tool. Set the tool options.
Flood Fill Tab Settings:
Fill Style: Solid Color
Blend Mode: Normal
Paper Texture: None
Match Mode: None
Opacity: 100
Sample Merged: Yes
- Right-click in the center of the image.
- Deselect.
Selections > Select None
- Your image should look like the one shown here.

- Close the file. Save the file if you like.
File > Close
Flood Fill -- Linear Gradient
- Open a new file.
File > New
Settings:
Width: 100 Pixels
Height: 100 Pixels
Resolution: 72 Pixels/inch
Background Color: White
Image Type: 16.7 Million Colors
- Select the Flood Fill tool. Set the tool options.
Flood Fill Tab Settings:
Fill Style: Linear Gradient
Blend Mode: Normal
Paper Texture: None
Match Mode: None
Opacity: 100
Sample Merged: Yes
Flood Fill Options:
Gradient: Electric Strip
Angle: 325
Repeats: 2
- Flood-fill the image (left-click in the center of the image.) Your image should look like the one shown here.

- Close the file. Save the file if you like.
File > Close
Flood Fill -- Pattern
- Open springfl.gif in Paint Shop Pro. It was included with the files you downloaded.
File > Open
Look in: Enter the directory in which you stored your files.
File: springfl.gif
Files of Type: CompuServe Graphics Interchange(*.gif)

- Open a new file. Do not close springfl.gif
File > New
Settings:
Width: 200 Pixels
Height: 200 Pixels
Resolution: 72 Pixels/inch
Background Color: White
Image Type: 16.7 Million Colors
- Select the Flood Fill tool. Set the tool options.
Flood Fill Tab Settings:
Fill Style: Pattern
Blend Mode: Normal
Paper Texture: None
Match Mode: None
Opacity: 100
Sample Merged: Yes
Flood Fill Options:
New Pattern Source: springfl.gif
- Flood-fill the image (left-click in the center of the image.) Your image should look like the one shown here.
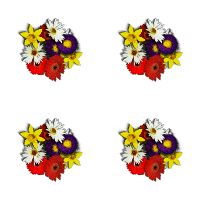
- Close the files. Save them if you like.
File > CloseFlood Fill -- Pattern
- Open swirl.gif in Paint Shop Pro.
File > Open
File: swirl.gif
- Open a new file.
File > New
Settings:
Width: 200 Pixels
Height: 100 Pixels
Resolution: 72 Pixels/inch
Background Color: White
Image Type: 16.7 Million Colors
- Select the Flood Fill tool. Set the tool options.
Flood Fill Tab Settings:
Fill Style: Pattern
Blend Mode: Normal
Paper Texture: None
Match Mode: None
Opacity: 100
Sample Merged: Yes
Flood Fill Options
New Pattern Source: swirl.gif
- Flood-fill the image (left-click in the center of the image.) Your image should look like the one shown here.
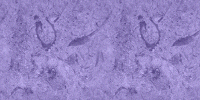
- Close the file. Save the file if you like.
File > Close
Flood Fill -- Blend Mode
Blend Modes are particularly useful when you want to change color but want to maintain the gradations of color that exist in the image. The exercise that follows illustrates using a Blend Mode with the Flood Fill tool.
- Open Plastic 3.tex in Paint Shop Pro.
File > Browse
Open the Textures folder under the Paint Shop Pro 6 folder. Double-click on Plastic 3.tex.
- Close the Browse window.
- Make a copy of the image.
Edit > Copy
- Create a new image so you can work with the new image instead of the original.
Edit > Paste > As New Image
- Increase the color depth of the image.
Colors > Increase Color Depth > 16 Million Colors (24 Bit)
- Set your foreground color to blue.
Settings:
Red: 64
Green: 64
Blue: 255
- Using the Selection tool, select a circle in the center of the image. Use the following tool options:
Settings:
Selection Type: Circle
Feather: 0
Antialias: Yes
- Select the Flood Fill tool. Set the tool options
Flood Fill Tab Settings:
Fill Style: Solid Color
Blend Mode: Color
Paper Texture: None
Match Mode: None
Opacity: 100
Sample Merged: Yes
- Click in the center of the selection.
- Invert the selection.
Selections > Invert
- Change the Blend mode to Difference and flood-fill the selection.
- Deselect.
Selections > Select None
- Your image should look like the one shown here.
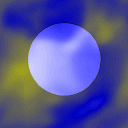
- Close the files. Do not save Plastic 3.tex. Keep this file in its original state. Save the new image, if you like.
File > Close
| Table of Contents |

