
With Excel, you can easily organize your data into columns and rows that you can sort and filter. However, in some instances, in addition to sorting and filtering, you may want to summarize, aggregate, or subtotal your data. You may even want to change a row into a column or a column into a row. This is where Pivot Tables come in. You can use Pivot Tables to sort, filter, summarize, aggregate, subtotal, change columns into rows, and change rows into columns.
Excel 2010 introduces Slicer. You can use Slicer with Pivot Tables to filter your data in multiple ways. For example, if your data is organized by region and year, you can choose the region and/or year you want to view.
Creating a Slicer is easy. After you create your Pivot Table, just click Slicer on the Pivot Table tools Options tab. The Insert Slicers dialog box appears. In the Insert Slicers dialog box, select the fields you want to use to create a filter. Excel creates a Slicer box for you. Select the fields you want to see; Excel filters out the rest. You can useSlicer to slice and dice your data in a myriad of ways by using multiple Slicer boxes.
Create a Pivot Table
Worksheet with the Range Selected
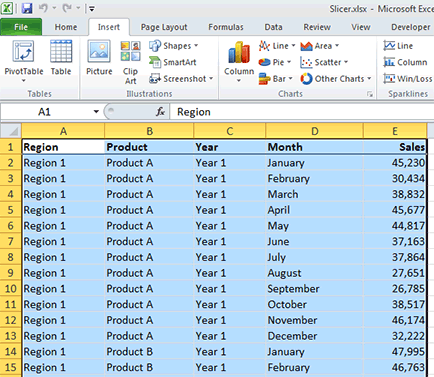
- Select the range of data you want to include in your Pivot Table. Include column labels.
- Activate the Insert tab.
- Click Pivot Table in the Tables group. The Create Pivot Table dialog box appears showing the range you selected in the Select A Table Or Range field.
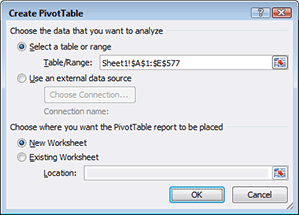
The Create Pivot Table Dialog Box
- Click to choose whether you want to place your Pivot Table in a new worksheet or an existing worksheet. If you choose an existing worksheet, enter the location.
- Click OK. The Pivot Table Field List panel appears and Excel reserves spaces for the Pivot Table.

A Pivot Table and the Pivot Table Field List
- Check the fields you want to include in your report. Excel places them in the Column Labels, Row Labels, and ∑ Values boxes. Click and drag to place fields in the proper boxes.
- If you want to use a field to filter, place the field in the Report Filter box.
- If you want the field to appear as a column, place the field in the Column Labels box.
- If you want the field to appear as a row, place the field in the Row Labels box.
- If you want to use the field to calculate, place the field in the ∑ Values box.
Excel creates your Pivot Table.
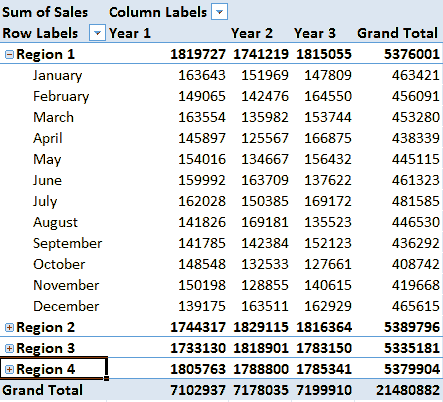
A Pivot Table
Add Slicer
The Pivot Table Tools Activated
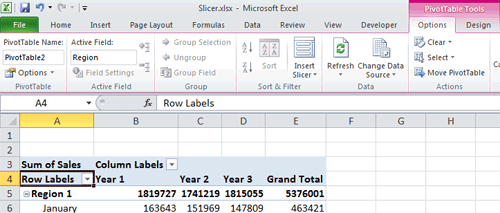
- Click anywhere within your Pivot Table. The Pivot Table tools become available.
- Activate the Options tab.
- Click Insert Slicer in the Sort & Filter group. The Insert Slicers dialog box appears.
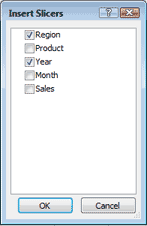
The Insert Slicers Dialog Box
- Click the fields you want to use to filter your data.
- Click OK. Slicer boxes for the fields you selected appear in your worksheet. You may need to drag the boxes to a new location.
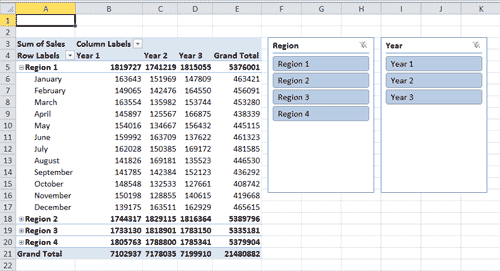
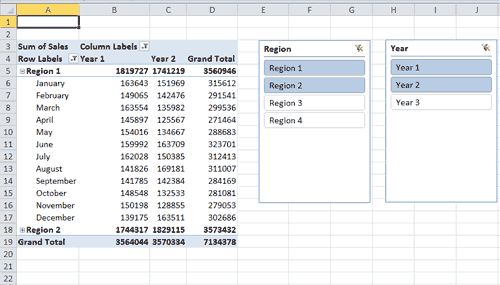
Two Slicer Boxes and a Pivot Table
Filter with Slicer
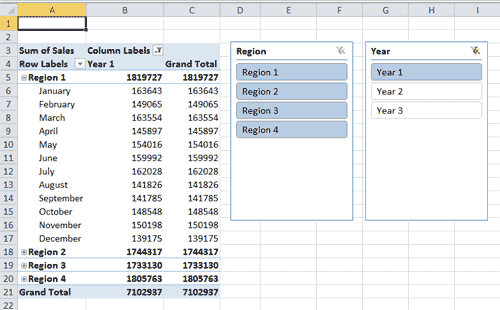
A Pivot Table Showing Year 1 Only
- To restrict the Pivot Table to a particular field value, click the field name in the Slicer box.
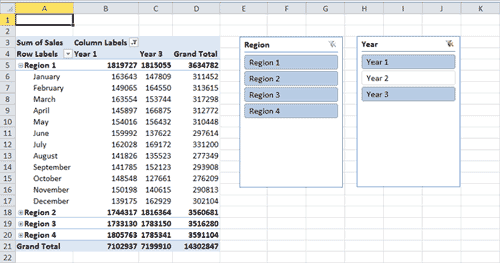
A Pivot Table Showing the Years 1 and 3
- To choose to see multiple fields, click the first field you want to see, hold down the Ctrl key and click the second field, hold down the Ctrl key and click the third field, and so on.
- To see all fields again, click the Clear Filter button
 .
You can filter using multiple Slicer boxes.
.
You can filter using multiple Slicer boxes.
A Pivot Table Showing Year 1, Year 2, Region 1, and Region 2